Base Layers
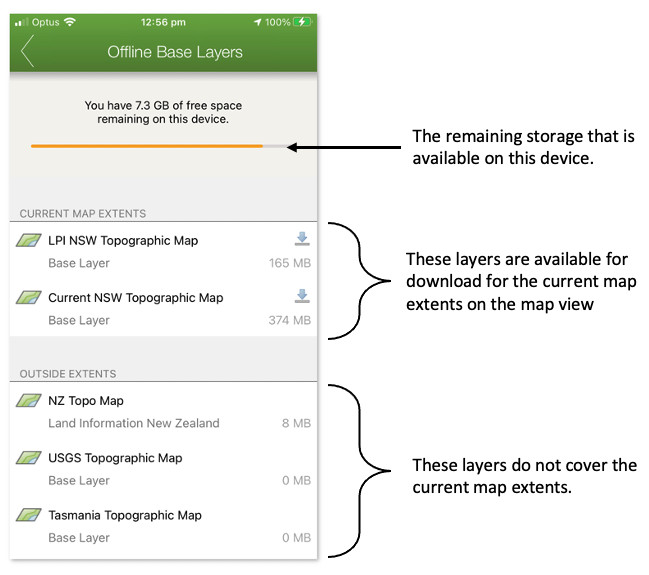
The Base Layers Screen lists all the non Google base layers stored on your device and the amount of storage space they’re using.
Base layers are stored locally on your device for performance reasons and to improve offline availability. There are 2 ways that
this happens. FireMapper downloads and stores tiles as you view the map in the map screen, and users have the ability to bulk download
all tiles within a certain area.
Each base layer is stored as a folder as a Compact Cache V2 in the FireMapper documents directory. There is a layer.json file in each base layer directory that contains the configuration for the offline layer.
Downloading Base Layers
On the Map Screen move the map to the region/area that you want to download
Tap the Spanner button in the top right corner of the Map Screen
Tap the Base Layers button on the Map Properties screen
4. Tap on the Base Layer(s) that you would like to download to the device. Only layers that are
available for the current map extents can be downloaded.
5. The download may take a few minutes to complete. You can download multiple layers at the same
time. FireMapper will download the tiles to the local device for the current map extents. There
is a limit on the number of tiles that can be downloaded for each layer to limit the size of the
download, especially for large areas. FireMapper will only download a maximum of 800 tiles per
any one zoom level.
6. Wait for a download complete message before closing the base layer screen. If you close the
base layer screen while the download is in progress, the download will be aborted.
Deleting Base Layers
You may want to delete a base layer if you are running out of local storage on the device. You
can also delete base layers generated from imported PDFs.
Tap the Spanner button in the top right corner of the Map Screen
Tap the Base Layers button on the Map Properties screen
Swipe right to left on the base layer you want to delete on iOS. On Android press and hold
on the base layer that you want to delete.
Tap the red Delete Layer button on the right side base layer item.
Tap Delete Layer button on the dialog to delete the local copy of the base layer. This will
free up any space used by the layer. You can not undo this operation!
Copying Base Layers
Copying Base Layers with FireMapper iOS and MacOS
The base layers can be accessed from FireMapper iOS using a MacOS computer. This is useful if
you want to copy base layers between devices.
Connect your iPhone/iPad to your MacOS computer.
Open the Finder app on your MacOS computer.
Select your iOS device from the left side bar in Finder window.
Select the Files tab at the top right corner of the Finders window.
Select FireMapper application to view the list of base layers. Some of these base layers
may be autogenerated by FireMapper as you view the map. Each base layer is stored as a compact
cache v2. Ignore the inbox folder, this is a special folder for imported maps.
Download Base Layer Folder from iPhone/iPad to Mac OS
To download a folder, drag it from the Finder window to your desktop (or another folder). This may
make a few minutes to complete, MacOS will not display any status while the download is occurring
which can be confusing. The folder will appear on your desktop after the download is complete.
Upload Base Layer Folder from Mac OS to iPhone/iPad
Drag a previously downloaded folder from the desktop to the FireMapper application in the finder
window. This may take a few minutes to complete, MacOS will not display any status while the download
is occurring which can be confusing. The folder will appear in the FireMapper base layer group after
the upload is complete.
This process can used to copy base layers between iOS devices.
Delete Base Layer Folder
Right click on the base layer folder under the FireMapper application and select delete. This will
permanently delete the folder from the device.
Copying Base Layers with FireMapper iOS and Windows PC
The base layers can also be accessed from FireMapper iOS using a Windows PC using Apple iTunes application.
Connect your iPhone/iPad to your Windows computer.
Open the iTunes app on your Windows computer.
Select the iPhone/iPad button near the top left of the iTunes window.
Click File Sharing, select an FireMapper in the list
Copying Base Layers with FireMapper Android and MacOS
You will need a copy of Android File Transfer application to transfer files between MacOS and an Android
device. Your computer must be using Mac OS X 10.5 and up.
Download and Install Android File Transfer on your computer
Open Android File Transfer. The next time that you connect your Android device, it opens automatically.
Unlock your Android device.
Connect your Android device to your computer with a USB cable
On your Android device, tap the Charging this device via USB notification.
Under “Use USB for,” select File Transfer.
An Android File Transfer window will open on your computer.
If your Android device has an SD card reader, there may be two locations that your can store base layers; one using internal
storage on the device and the other using external storage on the SD card.
Copy the base layer folders into the Android/data/com.firefrontsolutions.firemapper.enterprise/files/base_layers/ or
Android/data/com.firefrontsolutions.firemapper/files/base_layers/ depending on which version of FireMapper you are
using. Due to Android restrictions, FireMapper is not able to read outside these directories.
Copying Base Layers with FireMapper Android and Windows PC
Connect your Android device to your computer with a USB cable.
On the Android device, open the USB Preferences notification and update “Use USB for” to “File transfer”.
Windows will display the Android device under “This PC” in File Explorer.
If your Android device has an SD card reader, there will be two locations that your can store base layers;
one using Internal storage on the device and the other using External storage on the SD card.
Open “Internal storage” (or “SD Card”, or whatever your device calls its external storage)
on the device and then browse to Android/data/com.firefrontsolutions.firemapper.enterprise/files/base_layers/.
You will see a folder for each base layer on the device; open the base layer you want to copy
files into, and then use the File Explorer to copy into the “_alllayers” folder. The contents
of the “_alllayers” folder are a series of folders named “L09”, “L10”.
Create Your Own Tile Cache
FireMapper will automatically create tile caches on the map as you use the application. There is a folder
for each base layer that is automatically generated as you view the map.
Before creating your own tile cache, a good starting point is to copy an existing tile cache off the device.
Tile Cache Format
FireMapper only supports a Compact Cache v2 format with the following configuration:
Layer Configuration File
You will need to add a layer.json in the layer folder. This file is required for the FireMapper application
to discover the tile cache folder.
This file is specific to FireMapper and is not created by third party tools. It is a JSON file with configuration
information for the base layer. This needs to be a valid JSON file. You can use an online JSON validator to ensure
that the file is a valid JSON file to check the file. The last item in the JSON dictionary must not end with a comma.:
{
    "title": "LPI NSW Topographic Map",
    "min_zoom": 5,
    "max_zoom": 19,
    "priority": 10,
    "min_latitude": -36.39,
    "max_latitude": -28.100,
    "min_longitude": 141,
    "max_longitude": 153.599
}
title - the name for the base layer that is displayed in the app
min_zoom - the minimum zoom level that the layer is visible in FireMapper. This should be the smallest L<zoom> folder in the cache.
max_zoom - the maximum zoom level that the layer is visible in FireMapper. This should be the largest L<zoom> folder in the cache.
priority - the order that the layer appears in FireMapper. Use 5 if you want it to be the default layer in FireMapper. Use 150 if
you want it to be one of the last layers to appear in the list. Do not use anything less than 3.
min_latitude - this is the minimum latitude extents covered by the tile cache.
max_latitude - this is the maximum latitude extents covered by the tile cache.
min_longitude - this is the minimum longitude extents covered by the tile cache.
max_longitude - this is the maximum longitude extents covered by the tile cache.
Tile Folder Name
Use lower case letters and underscores only for the base layer folder name (e.g. lpi_nsw_topographic_map). This should be the same as
the title (but with lower case letters and underscores for spaces).
Do not use the same folder name as an existing FireMapper base layer. Each layer must have a different name.
Converting a TPKX File
You can import a TPKX tile into FireMapper iOS and it will automatically be converted into a compact cache on the device.
It is also possible to manually create the compact cache layer format required by FireMapper using the following steps.
Create a TPKX with the following settings:
Rename the generated TPKX file from a .tpkx file extension into a .zip file extension. Use a lower
case name for the file (e.g. usa.zip)
Extract the contents of the zip folder
Rename the tile folder to _alllayers.
Add a layer.json file in the same directory as the _alllayers folder. This file is required
by FireMapper and the base layer will not be loaded into FireMapper without it.
Use a text editor to create the layer.json. Make sure the extension is ‘.json’.
Following is sample layer.json that matches the sample USA.tpkx file:
{
  "title": "USA",
  "priority": 10,
  "min_zoom": 0,
  "max_zoom": 5,
  "min_latitude": 18.9247817,
  "max_latitude": 71.4062354,
  "min_longitude": -178.2175983,
  "max_longitude": -66.969271
}
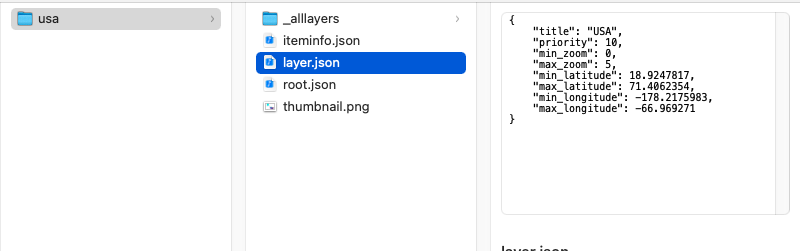
Copy the base layer folder (e.g. USA) onto the device.
Restart FireMapper. FireMapper only detects new layers when the application is restarted. The new
layer should be visible in the Base Layer screen.
FireMapper does not currently use the iteminfo.json, root.json, thumbnail.png or config.xml files.
It does not matter if these files exist or not in the layer folder.