Download the FireMapper Enterprise application from the Google Play store.
There are two versions on the Google Play store, make sure you download the Enterprise version.
Open the FireMapper Enterprise application
Tap Continue button at the bottom of the Location Permission dialog. FireMapper Enterprise will need access to your location for creating GPS recordings, showing and marking your current location, location sharing (if enabled) and captured geo-referenced photos.
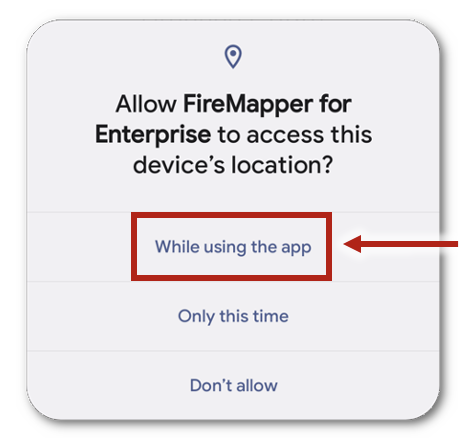
Tap Allow only while using app to allow FireMapper Enterprise access to your location while the app is in the foreground.
Note
If you want to do GPS recordings with the screen off, you will still need to update this to
Allow all the time via the Android Settings app. This can only be done from the Android
settings app due to security limitations of the Android operating system.
Open the Android Settings App.
Go to Apps or Applications page
Go to FireMapper Enterprise page
Go to Permissions page for FireMapper Enterprise.
Select Location permission and change it to Allow all the time. This will allow FireMapper
Enterprise to access your location when the app is in the background. This is required if you want
to record a GPS track while you are using other apps on your phone or the screen is turned off.
Tap the Scan QR Code button
Tap Allow only while using app to allow FireMapper Enterprise to access your camera. FireMapper Enterprise
uses the Camera for scanning QR codes and for capturing geo-referenced photos. You may need to tap the
Scan QR Code button again after granting permission to access the camera.
Scan the Licence QR Code provided by your FireMapper Portal administrator. FireMapper Enterprise will
automatically login to the organisation linked to the QR code.
Click User Profile link to configure your profile at the bottom of the main menu screen
If FireMapper is installed on your personal device, you can provide your First Name,
Last Name, Role on the User Profile screen. These fields are included in the metadata when
editing features on a shared map and also for labelling your location when location sharing is enabled.
You can optionally enable Share Your Location only if you would like to share your location with other users from
your organisation while using FireMapper. This setting is turned off by default, and users must opt in
their device if they want to enable it.
If you do decide to share your location, you may want to also change the Resource Type to change the icon
used to display your location to other users.
Enable Auto Sharing. Most users will want to turn this on. This will automatically share any
observation you add to an existing shared map instantly with other users. Auto Sharing should only
be turned off if you want to also add additional private features to a shared map that only you
can see.
Tap the top bar on the User Profile screen to return back to the main menu. You are now ready to start
using FireMapper
You are now ready to start using FireMapper.